
Installation Guide
Prerequisites
Machine with supported operating system
Internet Information Services (IIS) 10
GENESYS Server 2025
Recommend SQL Server 2019 (15.0) or newer
Some server versions of Windows require manual installation
Valid Licenses for GENESYS 2025 and Sidekick
Sidekick licenses are built into the GENESYS Sever license (contact licensing@vitechcorp.com for support)
Minimum Requirements
Windows Server 2025, Windows Server 2022, Windows Server 2019, Windows Server 2016, Windows 11
2 GHz processor, multi-cores/processors strongly recommended
CPU 4 core (vCPU)
16 GB RAM
Installation hard drive space requirements:
200 MB
Additional disk space required for GENESYS
Client Browser Support (Chromium-based)
Chrome/Edge v100+
Licensing via the GENESYS Server License Utility
Licensing for Sidekick is handled via the GENESYS Server License Utility.
Upgrading a Previous GENESYS License
Contact licensing@vitechcorp.com for adding Sidekick licenses to your account.
Once confirmed, launch the GENESYS Server License Utility from the Start Menu.
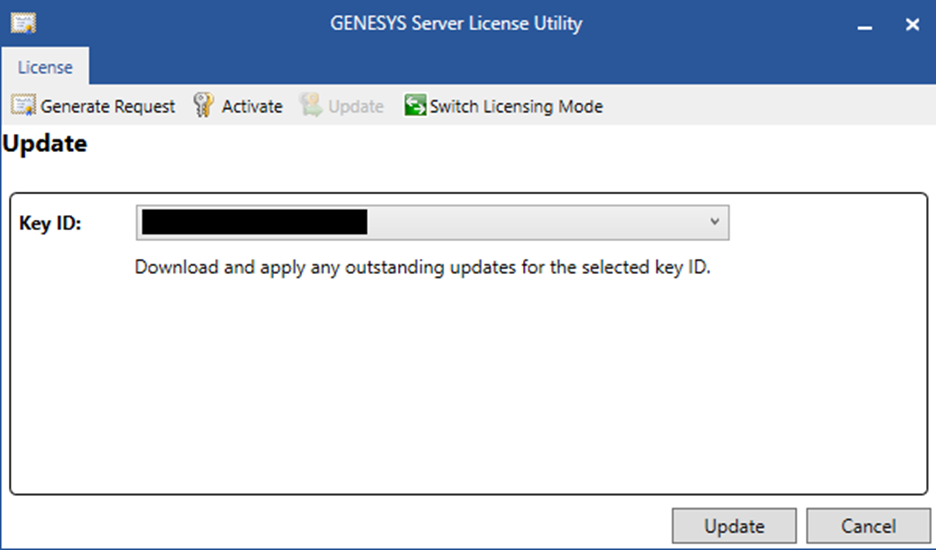
Navigate to the “Update” tab.
Select your GENESYS 2025 Server license key Id and click “Update” button.
You will receive confirmation when GENESYS has been successfully activated. If no internet connection is available, GENESYS must be manually activated. To manually activate, select the "Save Request" button in the lower right portion of the wizard. Then, copy the license request to a computer with internet access and email it to licensing@vitechcorp.com. Vitech will respond with a license file along with instructions on how to apply it.
New Installation
Upon first launch of GENESYS, you will be prompted to activate the product. A local license must be used for GENESYS 2025 Server which requires that a product key be entered. The product key will be emailed to you directly from Vitech prior to installation. If you wish to use a local license and have not yet received a product key, please contact Vitech Customer Support or your Vitech sales representative. After submitting the product key, GENESYS will attempt to automatically activate with Vitech's license activation server using the system's internet connection. You will receive confirmation when GENESYS has been successfully activated. If no internet connection is available, GENESYS must be manually activated. To manually activate, select the "Save Request" button in the lower right portion of the wizard. Then, copy the license request to a computer with internet access and email it to licensing@vitechcorp.com. Vitech will respond with a license file along with instructions on how to apply it.
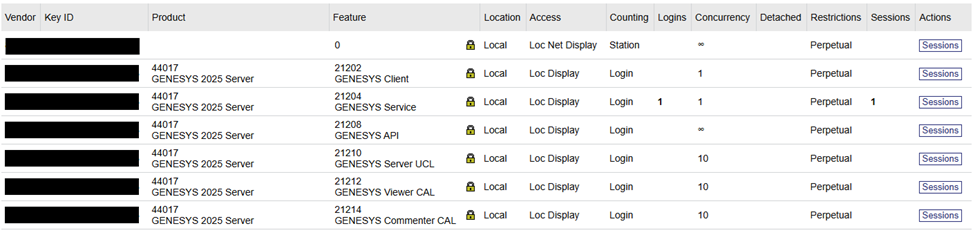
Verify License Activation
Once installed/updated, administrative users can verify the license by navigating to http://localhost:1947 on their server. Sidekick licenses appear as GENESYS Viewer CAL and GENESYS Commenter CAL. Please reach out to licensing@vitechcorp.com with any questions.
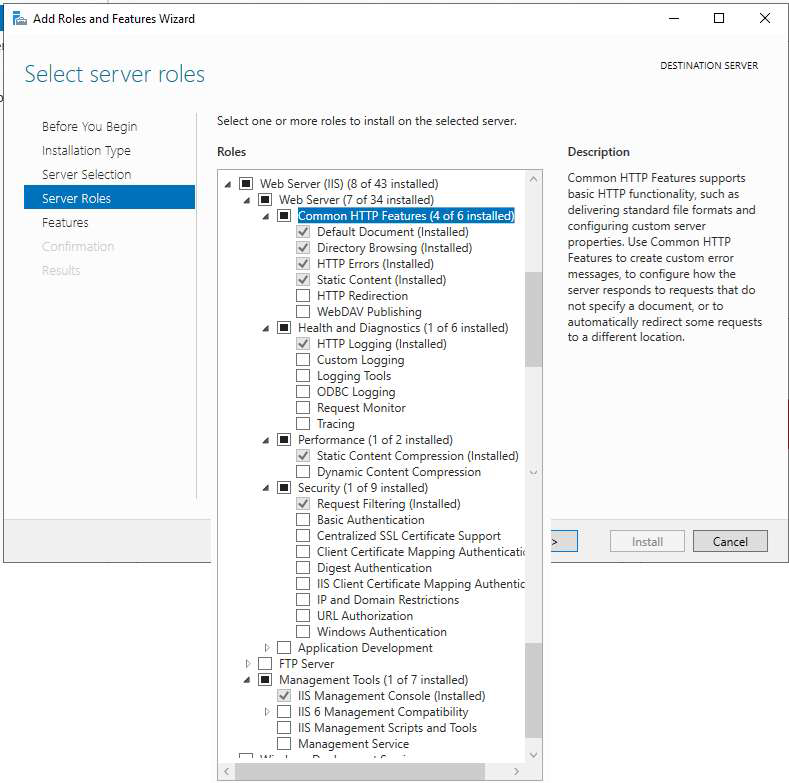
IIS Web Server
Verify IIS feature is installed (Start Menu > “Turn Windows Features On/Off”).
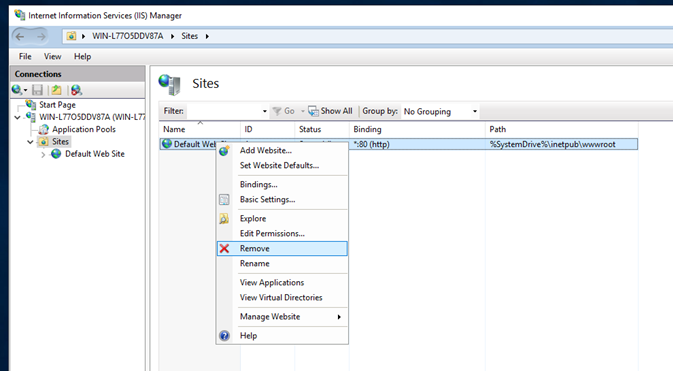
By default, Sidekick will install on port 443 (https). If you have any sites on that port it is required to change the bindings for the initial install
Windows Key, search for IIS
Open the window
Delete the sites.
SQL Server
GENESYS and Sidekick require a SQL Server instance. SQL Server Express 2022 is free (but has diminished performance compared to paid versions).
Sidekick supports Windows (integrated) users or SQL user with table-creation permissions.
Installation
Create New Instance (recommended to be shared with GENESYS server)
Setup SQL access in accordance with your IT policies.
.png?inst-v=4ef52afe-aa68-4cc9-a76b-41382328f04b)
.png?inst-v=4ef52afe-aa68-4cc9-a76b-41382328f04b)
.png?inst-v=4ef52afe-aa68-4cc9-a76b-41382328f04b)
.png?inst-v=4ef52afe-aa68-4cc9-a76b-41382328f04b)
Sidekick Application Installation Steps
Download Sidekick installer.
Launch installer
Install pre-requisites
NET Hosting bundle is required and will be downloaded and installed using the Sidekick installer **internet connection required
Manual install link if install machine does not have internet connection
Review licensing agreement
Configure SQL server
Select SQL instance (usually the same as GENESYS Server 2025)
Specify SQL logon credentials using integrated or a specific user
By default, Sidekick will use the current user credentials (integrated)
Specify a username and password to be validated
Configure IIS
Credentials for the Application Pool that Sidekick will run under within IIS will need access to properly execute
NETWORK SERVICE account can be used (“yes” option), if chosen it is recommended to specify user credentials for SQL (previous step).
Configure Sidekick users
Launch GENESYS Server 2025
Launch Admin Tools dialog by selecting “Utilities” menu from above the GENESYS ribbon and choose the first option “Admin Tools”
Navigate to the “Users” tab
Click “New User” button to create a user
Fill in Username and password sections
Confirm password
Click “OK” button
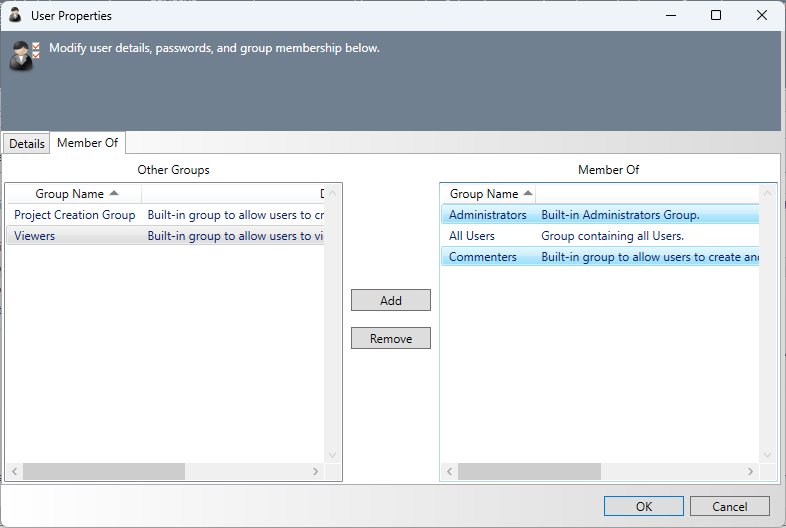
Double clicking the newly created GENESYS user account to launch the User Properties dialog
By default, GENESYS requires new users to login and change their password at the initial logon. To avoid issues with Sidekick authentication, it is recommended to either modify the user properties to uncheck the “Change password at next logon” option, or login to GENESYS with the new user before initial Sidekick login.
Navigate to the “Member Of” tab
Add the Sidekick user to the required groups
Sidekick has two groups (Commenters and Viewers) which are shipped with GENESYS 2025. Sidekick users must be a part of one of these two groups
“Commenters” users can comment on assigned review objects and participate in conversations. They can also interact with application settings according to their roles
“Viewers” users can access application contents according to their roles but will not be able to comment, participate in conversations, or interact with application settings
To grant a Sidekick user administrative privileges, add them to either Commenters/Viewers as well as the default GENESYS Administrators group.
Important notes:
A Sidekick user must be in the GENESYS Administrators group to create a review and bypass some role-based restrictions in the application
After a user’s login credentials are created in GENESYS, that user must successfully perform an initial login to Sidekick before such user is visible in the application for task assignment.
Configure GENESYS
From the Administrator Tools dialog (3.b.) navigate to “REST API” tab
In the General section the REST interface must be enable (Enabled option set to “True”)
In the HTTPS/HTTP section Disable HTTP must be set to “False.”
Launch Sidekick
The installer creates a shortcut link “Sidekick Local” (which will launch your default web browser) under the “Vitech” folder of the machine’s Windows Start Menu.
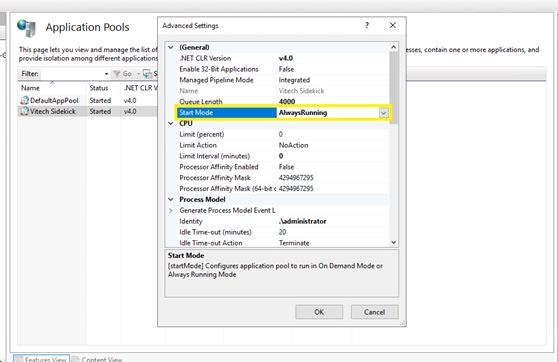
Recommended IIS Configuration
Sidekick utilizes services for periodic database updates, set the Application Pool’s “Start Mode” to “AlwaysRunning” to ensure these services can function.
Notes
Some Windows machines may report an error “reading setup initialization file” this issue can be resolved by running the installer via Window’s command-line interface
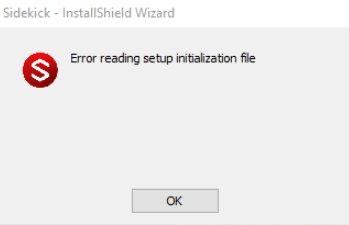
SidekickInstaller /tempextractpath"<path>" where <path> is recommended to be "%localappdata%\Downloaded Installations"
Sidekick is designed to work with the GENESYS 2025 Server and should be installed on the same server.
Sidekick’s default installation is configured with a self-signed HTTPS certificate that is installed on the host machine’s Trusted Root Store.
Additional Sidekick documentation is available under the “Vitech” folder in the Windows Start Menu.
A link to the localhost site is included in this folder as well.
Without additional configuration, Sidekick will be available remotely by IP address (e.g. https://localhost) or the FQDN of the hosting machine, but it is recommended to work with your IT group to create/distribute a TLS certificate for your organization.